You might be thinking that all folks interested in the science of dog training enough to travel all the way to California, and not get to a beach or any of the sights must surely be more than a little loopy, but that is not the subject of this article…
I first heard about loopy training from Alexandra Kurland and more recently from Hannah Branigan, both instructors at Clicker Expo. Loopy training is named after the cycle that happens in animal training. The behaviour loop first starts with a cue (there are many different kinds, such as verbal cues, physical cues, environmental cues, etc.). Then comes the behaviour the animal does in response to the cue(s). Then the reward sequence is initiated and ends with the animal receiving the reward. At this point the cycle can start again, hence why it is called a cycle. Let’s take a look at what this can look like…

So for a sit, the cycle or loop might look like…
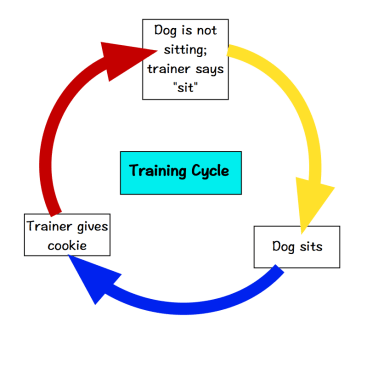
So far so good, right? Well, here is where things get interesting. The cookie the dog gets rewards everything that happens in the cycle or loop. This includes the bits that are hidden in the arrows as well as the target behaviour of “sit” that we are actually trying to reward. The sloppier our training, the more bits of “garbage” that get accidentally reinforced in our loop. Here are some examples of the sloppy bits that can become accidentally tied in to our sit behaviour if we aren’t carefully planning to avoid them.

So how do we avoid this mess? Well there are lots of things we can certainly do along each of the coloured arrow sections to help our dogs be able to focus on learning the behaviour we want and not the other things in the above loop. Working on tightening up the arrow sections helps us create tight training loops sometimes called Loopy Training. For this article, I’m going to focus on the red arrow as it is this piece that is often forgotten about and many of us are probably not even aware that the behaviours on this section are part of the loop at all.
So….what can you do as a trainer to help tighten up this loop? Here are 7.
- Use a treat to transport the dog from the end of the behaviour back to where the next behaviour can begin. In the example of the sit, you can use a second cookie to lure the dog up out of the sit after he finishes eating his first cookie in the sit. That way he is far less likely to engage in anything else between eating his treat and sitting again.
- Use treats that are easy to swallow and not likely to require much chewing for your size of dog.
- Plan in advance how many loops you will do in a set and get your cookies and toys ready and available.
- If using toys, keep play sessions short and end the play in the position where you need to be to restart the next loop.
- Use a “reset cookie” to move the dog from the finish position back to the start position. For the sit example, you can toss a cookie to the floor and say “search” (more on this next time when we look at the blue arrow).
- Use a target, bed or other stationing behaviour for the dog to go to in order to reset the start of the behaviour. Train the target, bed or station separately first before using it in the loop. This is really useful if you are working on a moving behaviour like a recall (come), distance work or a line of jumps.
- Use a bed, crate or other station for your dog between sets of loops so you can get yourself organized (treats, toys, plan, body orientation, etc.) and ready for the next set of loops to begin.
Tightening up the red arrow is an important step in improving your communication with your dog and in ensuring that you don’t accidentally get “garbage” behaviours reinforced inside your training loop. Happy Training!
