Loopy Training Part 3

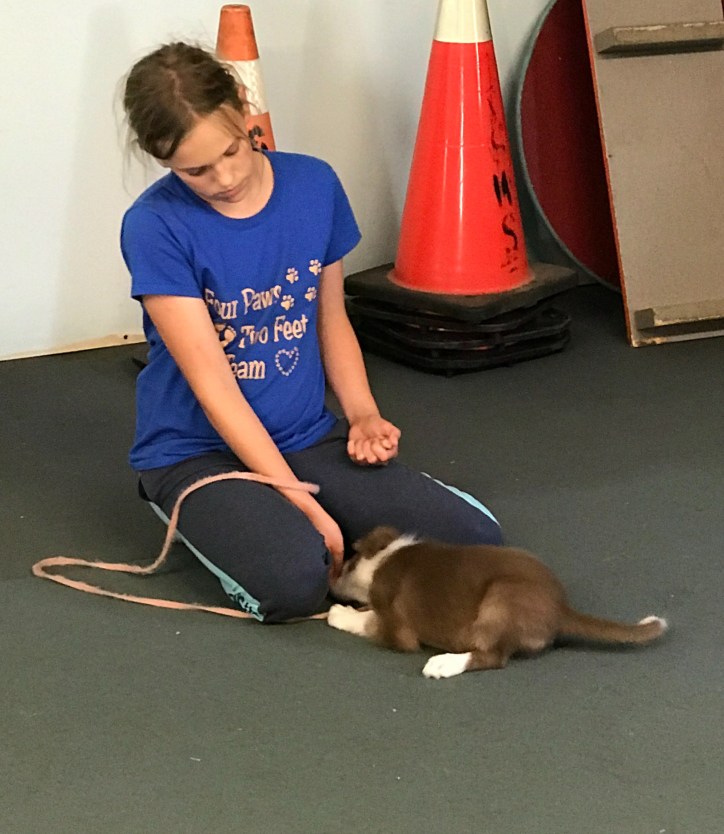
Alright, this is my final installment on loopy training training, at least for now… For this post I’m focusing on the yellow arrow in the training loop.

Loopy Training Graphic-1b

I’ve left this one for last, because I think that it is probably the most obvious for many people that what the dog does between the cue and finished execution of the behaviour is rewarded by the cookie. Let’s take a look at the more specific example of sit to see some places where this can trip up our training plan.

Loopy Training Graphic-1a

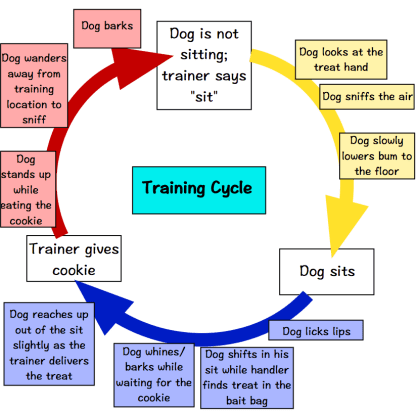
In above picture of the training loop, I’ve stuck to examples of things that might happen after you give your verbal cue to sit. Shifting their eye focus, sniffing the air and a slow execution are all things that you might see. If these behaviours are followed by a cookie, then they are rewarded by the cookie because they fall inside the bigger training loop.

The yellow arrow gets more interesting when you realize that the antecedentor cue is so much more than the word you say. In fact, it may be a bit hard to tease out where the antecedent starts… Does it begin when you unclip your dog’s leash to begin the exercise? Or maybe when you step into the training building or arena? How about when you get into the car? Start packing your training bag? Cutting up the treats on the counter? What about when you put on your dog training clothing? What about cutting up the treats on the counter at home?  Dogs are great predictors. Most people report that their dogs know they are heading to training class long before they are even in the car. But that is food for another post someday as we jump into the rabbit hole of training loops inside training loops…

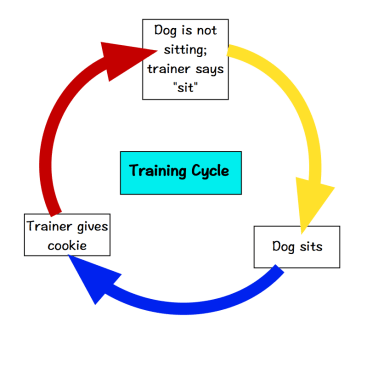
For now, let’s just focus on ways we can reduce “garbage” in the yellow arrow. Here are 4.

  1. Give a non-contingent reward before you begin. A non-contingent cookie means that the dog didn’t have to do a specific behaviour to earn. If your dog has been on its bed or in its crate for a few minutes before beginning, it is possible that there is some built up frustration or anticipation for the rewards. Giving the dog a non-contingent reward helps us to start our current session with positive emotions. Giving the dog a cookie as you open the crate or clip on/off the leash, may not be exactly “non-contingent” but I think it is close enough for this to pay off.


  1. Begin each training session with some offered behaviour. Offered behaviours are things your dog will do without a specific verbal or physical cue such as give eye contact, sit, lie down, or take heel position. Of course, as mentioned above, there are cues in the environment and the setup telling them what offered behaviours are likely to pay off, but if there is no specific cue, you avoid the risk of the “garbage” in the yellow arrow getting attached to your precious cue word. Offered behaviours also serve as a bit of a thermometer telling you if your


  1. Start with easier behaviours. Beginning with easier behaviours your dog knows well can help you build up something trainers are calling Behavioural Momentum, which looks like a work flow. Think of it as getting the behaviour juices flowing before moving on to something more complex. This will hopefully reduce latency, the time between the cue and the behaviour” shortening up the yellow arrow and leaving less time for “garbage” to creep in.


  1. Consider more shaping. If you aren’t getting quick execution of the behaviour to your cue, think about dropping out the cue and going back a step to help make the behaviour cleaner and faster before adding back in your cue. If that doesn’t help, you may have to do it again, but this time change your chosen cue. Perhaps the cue you selected is too similar to another cue and it is causing some confusion in your learner, or perhaps you have already poisoned your desired cue somewhat by linking it to some garbage behaviour you don’t want.

I’m sure there are many more options out there to tighten up the yellow arrow. Perhaps you can share some of your own ideas. Happy Training!


Loopy Training Part 2

img_0896.jpg

We will begin with a recap of what a training loop means. Loopy training is named after the cycle that happens in animal training.  The behaviour loop first starts with a cue, often called an antecedent. Cues or antecedents can be a lot more broad than most people think as they extend far past the word or hand signal we think of as the cue to environmental cues for the dog such as where we are located, how we are standing, or if there are any other prompts present such as a mat or kennel. Even time of day and the clothes we are wearing can all be part of the antecedent.  Then comes the “target” behaviour that we are hoping to train.  Then the reward sequence is initiated and ends with the animal consuming the reward in some form. If the reward is a cookie, we can see how that would happen, but if the reward is touching, or a play session with a toy, the reward ends when the handler stops delivering the reward.  At this point the cycle can start again, hence why it is called a cycle. Let’s take a look at what this can look like…

Loopy Training Graphic-1b

So for a sit, the cycle or loop might look like…

Loopy Training Graphic-1

So far so good, right? Well, here is where things get interesting. The cookie the dog gets rewards everything that happens in the cycle or loop. This includes the bits that are hidden in the arrows as well as the “target” behaviour of sit that we are actually trying to reward.  The sloppier our training, the more bits of “garbage” that get accidentally reinforced in our loop.  Here are some examples of the sloppy bits that are hidden in the arrows and that can become accidentally tied in to our sit behaviour if we aren’t carefully planning to avoid them.

Loopy Training Graphic-1a


So how do we avoid this mess? Well there are lots of things we can certainly do along each of the coloured arrow sections to help our dogs be able to focus on learning the target behaviour we want and not the other things in the above loop. Working on tightening up the arrow sections helps us create tight training loops sometimes called Loopy Training. For this article, I’m going to focus on the blue arrow as it is this piece that is often forgotten about and many of us are probably not even aware that the behaviours on this section are part of the loop at all.

So….what can you do as a trainer to help tighten up the blue part of the loop? Here are 5.

  1. Be a clean trainer. The mechanics of good operant training require that you give your “event marker” BEFORE you initiate the reward sequence.  In practical terms this means that you “click” or say “yes” before you begin your reach toward the bait bag or treat bowl. I often see trainers reaching for the bait bag before the event marker is completed. This causes problems for a variety of reasons including building eye shifting and perhaps weight shifting, or even full orientation toward the food location into the behaviour. It also creates the messy question about what the event marker actually is. Is it the “click” or is it the movement of your hand?
  2. Practice the mechanics of your treat delivery without your dog before you begin. Do this in the place where you will train, imagining the dog is doing the same behaviour you are about to work on.
  3. Have your treats ready by preparing them in advance into small bite sized pieces for your training session. They should be out of the wrapper and ready to deliver straight into your dog’s mouth.
  4. Have the treats easily accessible in a bowl or bait pouch so you don’t have to dig into the pockets of your skinny jeans or through several zip lock bags to get out the reward.
  5. Use a specific reward cue that tells the dog what reward to expect and how to access it. This is a pretty new idea for me, as, although I have a few words that tell my dog to access reinforcers, I usually use the same words for toys and food and I sometimes also use the same word for come and get the reward, and stay there, the reward is coming to you. This leaves the dog to read other contextual cues to know which reward getting behaviour to initiate. I’ll do another, more detailed post on this later, but a simple example would be to say “yes” and deliver the cookie at your side so that your dog comes toward you and takes the cookie from your hand, or say “niiice” and deliver the cookie to your dog’s mouth in the style of a baby bird.  Hannah Branigan calls these two delivery styles “take out” and “room service” respectively. Using different cues reduces the risk of confusion and frustration in the blue part of the loop which can sometimes mean a delay in the blue portion of the training loop.

There are of course lots of other ways to clean up the blue arrow part of the loop, but if you try the 5 above, I think you will find they make a big difference. Happy training!

Heather

Loopy Training Part 1

fullsizeoutput_57c

You might be thinking that all folks interested in the science of dog training enough to travel all the way to California, and not get to a beach or any of the sights must surely be more than a little loopy, but that is not the subject of this article…

I first heard about loopy training from Alexandra Kurland and more recently from Hannah Branigan, both instructors at Clicker Expo. Loopy training is named after the cycle that happens in animal training.  The behaviour loop first starts with a cue (there are many different kinds, such as verbal cues, physical cues, environmental cues, etc.). Then comes the behaviour the animal does in response to the cue(s).  Then the reward sequence is initiated and ends with the animal receiving the reward. At this point the cycle can start again, hence why it is called a cycle. Let’s take a look at what this can look like…

Loopy Training Graphic-1b

So for a sit, the cycle or loop might look like…

Loopy Training Graphic-1

So far so good, right? Well, here is where things get interesting. The cookie the dog gets rewards everything that happens in the cycle or loop. This includes the bits that are hidden in the arrows as well as the target behaviour of “sit” that we are actually trying to reward.  The sloppier our training, the more bits of “garbage” that get accidentally reinforced in our loop.  Here are some examples of the sloppy bits that can become accidentally tied in to our sit behaviour if we aren’t carefully planning to avoid them.

Loopy Training Graphic-1a

So how do we avoid this mess? Well there are lots of things we can certainly do along each of the coloured arrow sections to help our dogs be able to focus on learning the behaviour we want and not the other things in the above loop. Working on tightening up the arrow sections helps us create tight training loops sometimes called Loopy Training. For this article, I’m going to focus on the red arrow as it is this piece that is often forgotten about and many of us are probably not even aware that the behaviours on this section are part of the loop at all.

So….what can you do as a trainer to help tighten up this loop? Here are 7.

  1. Use a treat to transport the dog from the end of the behaviour back to where the next behaviour can begin. In the example of the sit, you can use a second cookie to lure the dog up out of the sit after he finishes eating his first cookie in the sit. That way he is far less likely to engage in anything else between eating his treat and sitting again.
  2. Use treats that are easy to swallow and not likely to require much chewing for your size of dog.
  3. Plan in advance how many loops you will do in a set and get your cookies and toys ready and available.
  4. If using toys, keep play sessions short and end the play in the position where you need to be to restart the next loop.
  5. Use a “reset cookie” to move the dog from the finish position back to the start position. For the sit example, you can toss a cookie to the floor and say “search” (more on this next time when we look at the blue arrow).
  6. Use a target, bed or other stationing behaviour for the dog to go to in order to reset the start of the behaviour. Train the target, bed or station separately first before using it in the loop. This is really useful if you are working on a moving behaviour like a recall (come), distance work or a line of jumps.
  7. Use a bed, crate or other station for your dog between sets of loops so you can get yourself organized (treats, toys, plan, body orientation, etc.) and ready for the next set of loops to begin.

Tightening up the red arrow is an important step in improving your communication with your dog and in ensuring that you don’t accidentally get “garbage” behaviours reinforced inside your training loop. Happy Training!